Cryonics Callout Training with Cryonics UK
Most people visiting the Live Forever Club website will be aware of cryonics – the idea of freezing your body (or just your head) when you die, in the hope that future technologies will be able to (i) revive you without further damage, (ii) cure whatever you died of, and (iii) slow/reverse ageing – as if you died in your 90s of cancer, even if that is cured you’d probably only have a couple more years to experience the future.
Although my plan is to live forever (or at least, a very long time, societal and natural disasters willing) I know many people in the life-extension community are signed up with a cryonics provider, as a plan B, in case they don’t live long enough to welcome the rejuvenation revolution.
A lot has been written to explain how the people are stored, usually accompanied by a picture of the gleaming liquid nitrogen cooled Dewar flasks, along with the ethical questions of the procedure. However, the journey to the semi-final resting place is often overlooked.
To explore how someone who has signed up to a cryonics program makes that transition, I attended one of the regular cryonics demonstration and training sessions put on by Cryonics UK. It turns out there are 4 key stages in the process – standby, initial cool down, perfusion and transportation.
Cryonics UK
The names some people will be familiar with are likely to be the cryopreservation providers such as Alcor, Cryonics Institute, KrioRus or the relatively new Tomorrow Biostasis. But, if you don’t live (or, more accurately, die) within travelling distance to one of the few storage facilities in the world, how do you get there?
This is where Cryonics UK comes in. It provides the immediate care and cooling of the patient (a term used purposefully throughout the training rather than “the body” or “the deceased”) and arranges transportation to the chosen cryopreservation facility. It calls its service the "ambulance to the future" – but there is a lot more to it than just having have their own ambulance.
It is a registered charity run by volunteers. However, as you’ll read below, non-commercial does not mean unprofessional. Cryonic UK’s procedures are well documented and available on its website for public scrutiny (no smoke and mirrors here) – each new edition highlighting the changes since the last one, a recognition that lessons are learnt at every call out which may need to be incorporated into the evidence-based procedures.
Training Format
Cryonics UK runs 3-4 training sessions per year, at different locations across the UK where possible.
Tim Gibson, who runs the charity, brings along the ambulance and all the equipment used during a call-out, so that people are able to see (and handle) what is really involved. Although about a third of the audience were people like me – interested but not active cryonicists – the rest were members (who are signed up to be cryopreserved) with half of those also being volunteers to help preserve someone before it is their turn.
After an explanation and demonstration, everyone has the opportunity to give it a go. Understandably, the members are encouraged to take part in the scenarios several times during the day as, although the theory is relatively straightforward, in practice things go wrong (such as equipment being in the wrong place, the patient being positioned awkwardly) which only experience helps you to prepare for and to get used to the fact that every environment is different. Although there is a manual of the steps involved, in a real-life situation you will likely have to make a decision on the fly.
The training sessions are usually followed by a dinner (nothing swanky) that provides a great opportunity for some interesting conversations as, however niche cryonics appears, there are still plenty of different reasons for doing so and a variety of views on the likelihood of success and what the future might hold.
If you want to attend one yourself, then keep an eye out on the Meetup group page.
Standby
Possibly the most important requirement for successful cryogenic storage is to get the body cooled down as quickly as possible after clinical death so as to stop cellular damage. For that to happen, a team needs to be present, waiting for the moment to start, and a lot needs to be organised in advance for them to be in place.
Ideally, well in advance, the person has decided that they want to be “frozen” and will have selected a plan with a cryogenic organisation. Some of the plans include the standby team’s cost, however for others the standby team will need to be organised, and paid for, independently.
Cryonics UK is a charity and charges for all of the consumables at cost (i.e. no profit) and everyone in the callout team are volunteers who don’t get paid for their time. There is a fixed fee of £5,000 to cover running costs of the charity, though is waived after 3 years of Cryonics UK membership – so think ahead! In total, if not covered by your cryonics storage plan, then you’ll need to allow up to £30,000 for the emergency assistance.
Most people who sign up for cryonics pay for it via a life insurance policy – but make sure it’s a suitable one where the storage company is the beneficiary, as the team can’t start without guaranteed payment and if the proceeds go into the general estate there’s no certainty that the executors will follow the wishes in the will. However, it turns out that most calls the organisation receives are last minute, which means a sudden rush of organisation and payment.
Once notified, a standby team of 3-5 volunteers will try to arrive a day or two before death, which with chronic conditions is easier to predict than might be expected. But they’re not just sitting around, there is a lot of preparation to be done to make the process as speedy as possible, particularly things like agreeing with a doctor how death will be verified before the team can start its work. As was highlighted many times at the training, every case is different – not just whether death occurs at home, in a hospice or in hospital, but that people have different views, for example, some hospitals are quite welcoming, whereas others won’t allow any equipment onto their site.
Initial Cool Down
Upon confirmation of clinical death the team go into action.
First off, two people independently check that there are no signs of life (using a pulse oximeter, a stethoscope and a torch to check for pupil dilation). Next, is to get the patient into the ice bath as quickly as possible – ideally it is already in the room, but depending on circumstance it may be in the ambulance.
Some good advice was offered to maintain the dignity of the patient, for example, handle the body as if they were alive and would feel pain. Same when packing ice around the patient, even if some methods could be quicker if treating the patient as an inanimate object, it is important to consider how it may appear to a loved one observing. Although, saying that, most activity occurs in the privacy of the (cramped) ambulance as otherwise it could be quite upsetting.
I asked where they get all of the ice from, and although an ice machine is available, because it melts it is often necessary to replenish the stock from a local supermarket… and ignore the jokes about late night parties – the cashier probably doesn’t really want to know what it is going to be used for.
The target of the initial cool down is to achieve a body temperature below 20 °C in the few hours after death and before perfusion starts. Without intervention, the body may only cool as little as 4-5 degrees.
Once in the ice bath, a LUCAS cardio-pulmonary support (CPS) device is fitted around the patient’s chest and started up. It’s noisy – one of the reasons the whole process can appear quite brutal (but necessary) and therefore carried out away from the next of kin. Keeping the heart pumping will do 3 things: (i) keep blood flowing to cells, (ii) cool the body, (iii) circulate the medications.
Then, or more likely in parallel, it is necessary to clear the airway, insert a Combitube and start ventilation so as to keep the cells oxygenated whilst cellular level metabolism continues.
There is a cocktail of 8 different drugs that need to be administered – this used to be 16 but thankfully things are getting simpler. Some have to be mixed on site as they have a short life (typically 1-2 days). The pharmaceutical drugs are attached to a multiport stopcock manifold which itself is linked to a FAST-1 intraosseous needle which goes into the sternum.
Tim gave a few examples of where the procedure has been improved based on experience including adjusting the height setting on the LUCAS plunger and carrying 8 bottles of oxygen instead of 10. Why 10? Because it used to be 8 but then they ran out on one callout, so now it’s 10 – it’s clear the team want to make the procedure work as best as can be possible. Note that the O2 is used to power the LUCAS, not for ventilation.
When deciding on the procedures, Tim also acknowledges that it is a balance of perfection versus simplicity – if the procedure is too difficult there is an increased risk of errors, so sometimes it better to make sure something easier is done correctly.
As well as the formal procedure, there were also some great practical tips shared, like holding a syringe against your own hand so you don’t stab yourself if knocked.
I have omitted some details from the above, mainly around the messiness of death which can include bowel evacuation (as all of the muscles relax) and vomiting (induced by mechanical CPS). This is the sort of thing movies omit but the standby team need to be prepared for (mentally, and with incontinence pads, etc.).
Practical training for initial cryonics cool down
Once the demonstration was over, it was the audience’s turn. With gentle encouragement from Tim everyone had a go, with the volunteers doing it several times as they will be putting it into practice one day.
In my round, there was one volunteer and two novices, which I think was done on purpose as the leader may have relatively inexperienced people on their team, so it’s useful to have them having to keep an eye on the others.
My initial task was getting out the equipment to check for clinical death and checking for pupil dilation. Even this was fiddly so you wouldn’t want to be doing it for the first time in real situation.
Then it was time to disassemble and reassemble the scoop stretcher to move the patient (a CPR training mannequin) from the bed to the ice bath trolley. Getting the stretcher apart and together was awkward, especially when you’re unfamiliar with how the catches work – another reminder of why repeat training is so important; I can imagine that after a few goes it becomes much easier.
Finally, I attached the needle to the sternum using a practice device with Velcro (so as not to damage the dummy) – the real one has lots of needles to hold it in place, and training videos on real people show that it is quite a physical task to get this inserted securely. I decided to leave the medications to the others as the manifold looked too complicated to connect for me as a first timer.
After a well-deserved coffee break, a trio of experienced members had a final training run – a much smoother and competently carried out affair and done in half the time (about 6 minutes) than other efforts.
Even with a few more training sessions to gain confidence in the procedures, I wondered how most volunteers would react the first time they actually have to deal with a real patient. Tim explained that the charity offers for them to attend an embalming demonstration first which the volunteers have found to be a positive and useful experience.
Perfusion
In the afternoon, the training demonstration moved onto perfusing the patient with cryoprotectant. This is done to replace as much of the body’s water as possible, with a special anti-freeze, to prevent ice crystals forming when the patient is frozen which would damage their cells.
By this time in a real callout, the patient will have been taken by ambulance (in the ice bath, with continuing CPS and ventilation) to a local funeral parlour, into the undertaker’s washroom, where all the equipment must be setup before the patient is removed from the ice bath.
This stage is more physics than medical, with pressure pumps, gauges, tubes and valves. However, the first step – inserting cannulas into the arteries and veins in the neck is done by an embalmer. But this is not the sort of embalming they do every day, so the manual has lots of advice and explanations for them.
Which perfusate is used depends on which cryonics storage is being used – Cryonics Institute has a blend called VM1, and Alcor calls its version M22. There are slightly different methods used, depending on the perfusate, and it looks like we did the slightly more complicated pressure system which is needed when using VM1 as its concentration has to be stepped up from 10% to 70%.
- The basic setup is this:
- The perfusate (initially a saline solution) is put into two pressure vessels
- This is pressurised by a pump set to a pressure of 0.13 bar
- A tube comes out and goes through a heat exchanger
- This heat exchanger is connected to a different pump that cycles ice-cold (normal) anti-freeze around it to provide a final drop to the perfusate temperature of up to 5 degrees which should enter the body at around 0 °C
- The tube splits into two (Y-shape) ready to be inserted using cannulas into the patient’s carotid arteries
- More cannulas are inserted into the jugular veins to attach waste tubes to
- The system is turned on to check and remove bubbles – the tubes have flow meters to visually confirm that the fluid is moving
- When the saline solution is almost finished, add 5 litres of 10% perfusate, and connect system to the patient
- Alternate the pressure vessels to build up to 30% then 70% concentration perfusate
- Continue until either all of the perfusate has been used, flow stops it is pure perfusate being drained (by measuring its refractive index)
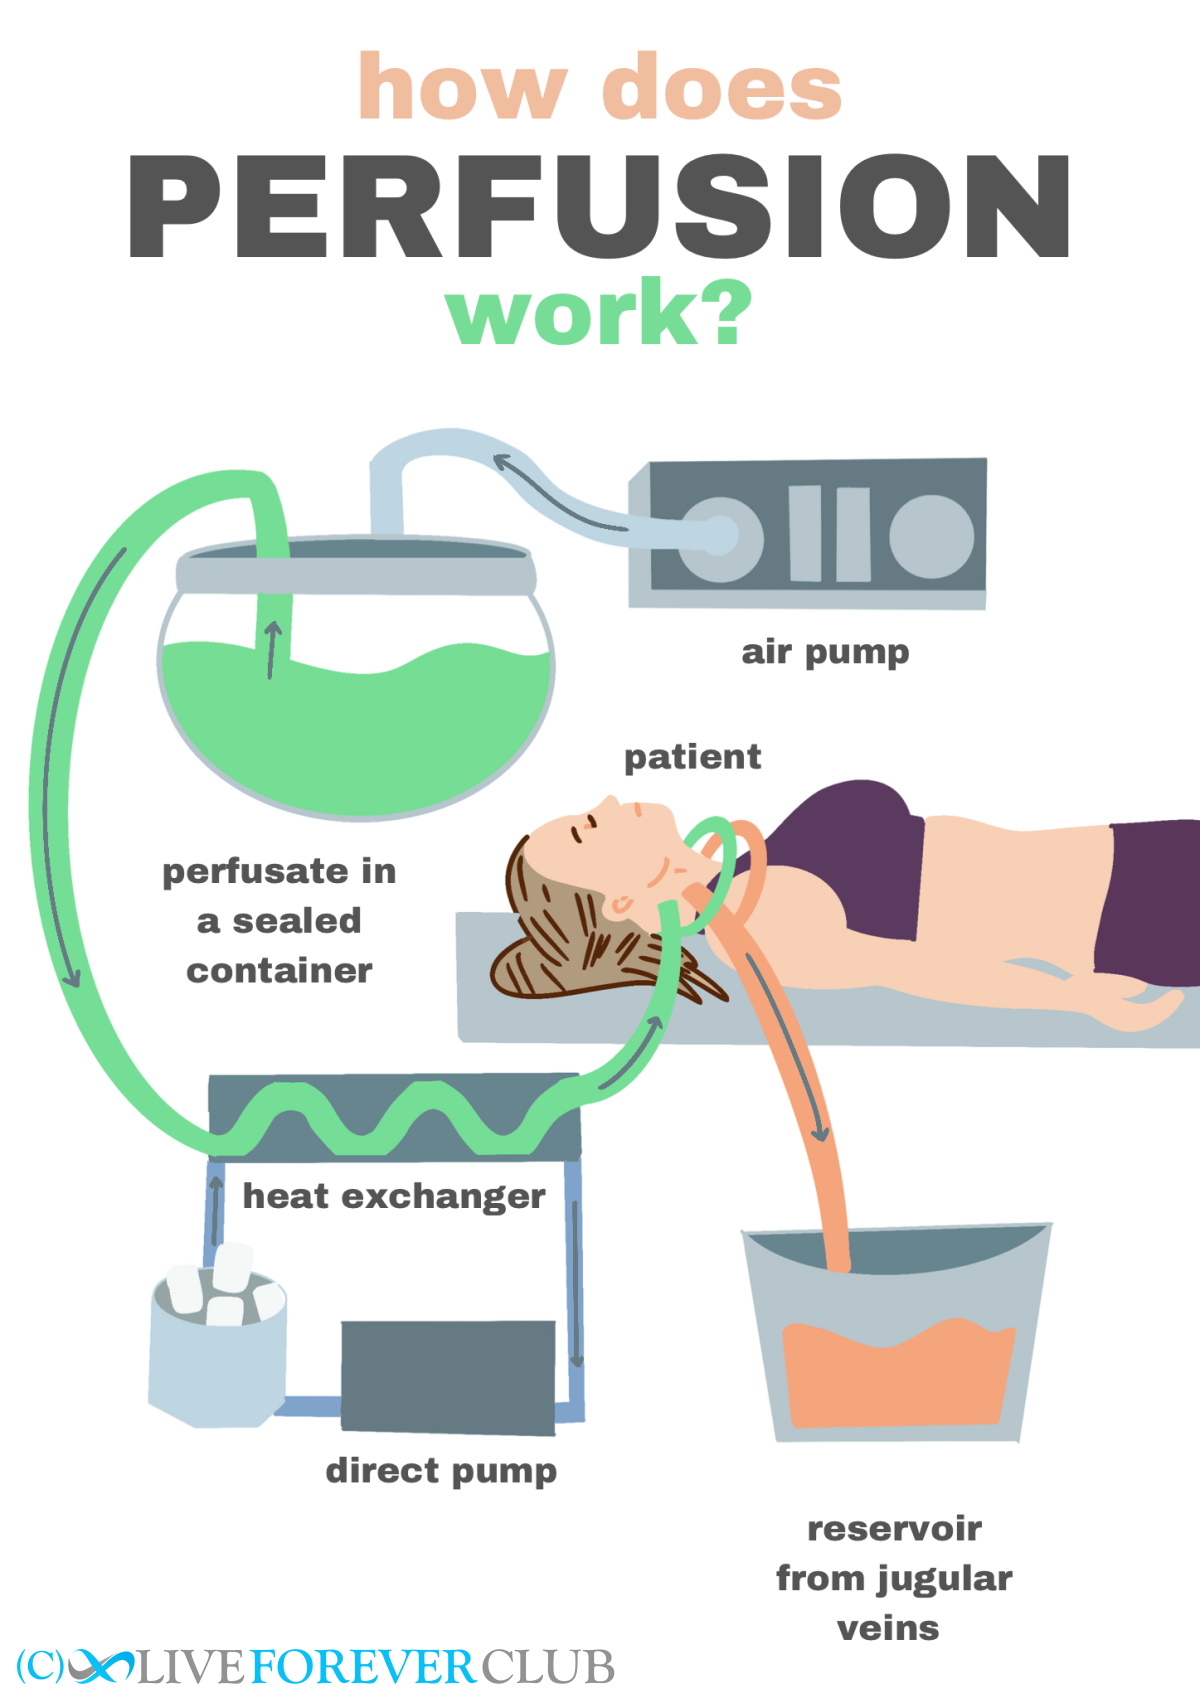
A lot of care is taken to keep the patient cool and to work as swiftly as possible, though in reality, even in the ice bath the patient’s cells’ activities have slowed down dramatically. Some heart surgery procedures reduce the body temperature by a few degrees which increases the survival window from a few minutes to a couple of hours – whereas at a callout even the initial cooldown will reduce the body temperature by around 20 degrees.
Transportation
Although not demonstrated, there was an explanation of what happens after the body has been perfused with the cryoprotectant. The patient now needs to be prepared for transport to the long-term cryonics storage facility.
The transport box needs to be pre-cooled as not to warm the body back up – so is loaded up with dry ice (which is at nearly -80 °C) whilst the perfusion is being performed. When ready, the patient is placed in a body bag inside an inner case (a Ziegler case rather than a casket) and dry ice is placed around the body bag as well as between the metal inner case and transport box.
A temperature logger is left in the patient’s nose so that their temperature can be monitored, and which must fall below -65°C before shipment. This can get through a lot of dry ice – 100 kg initially then topped up with around 50 kg every day.
Then, finally, preparation for the flight (there aren’t any cryonics providers in the UK) includes checking how much dry ice is allowed in the box (as it varies by airline and even by aircraft) and gathering a mass of documentation. Then, it’s off to their semi-final resting place, waiting for a new them to emerge into the future.
Conclusion
It was a totally fascinating day – along with the training described above it was also an opportunity to speak to people that were, or were considering being, signed up to cryonics - all with slightly different reasons and views on the practicalities, science and ethics.
If you’ve any interest in cryonics at all, I’d recommend attending on of these training sessions. And don’t worry about whether you have any experience – even Tim Gibson only started off with a first aid certificate and a bit of practical experience of accidents from his watersports career. However, now he’s been out to over 10 deployments so is probably one of the most experienced callout technicians in the world.
Unfortunately, I was not allowed to take any photos. A minor inconvenience for this blog, but disappointing that the reason given was that photos of things going wrong during a training session have been used as part of disparaging articles by reporters who, I suspect, probably already had their mind set on the tone of their article. I went in open-minded, half expecting to discover a bunch of amateurs with more ideology than ideas, but instead found a professional (though unpaid!) team whose procedures are better documented than many a clinical practice. Anyone that thought being cryopreserved was as simple as putting the body in a freezer is very much mistaken!
Given it’s not possible to know whether all these efforts will be successful, my personal strategy will continue to be saving what would go towards cryonics storage fees and, instead, spending it on approaches that could extend my life long enough to reach longevity escape velocity. I admit, a concept no more proven than cryonic storage.
If I had the spare cash, I’m certainly more likely now to sign up, having seen the science in action, and I would encourage anyone interested in cryonics to get in touch with Cryonics UK as I’d happily trust my near-dead self in their hands.
Mentioned in this blog post:
Click on resource name for more details.

Cryonics UK
Non-profit organisation which provides assistance to those who wish for their body to be cryopreserved
Topics mentioned on this page:
CryonicsCryotherapy Review – my experience at CryoLabs
Mitochondria, Autophagy and Neurodegenerative diseases: A perspective